Are you tired of tossing and turning at night? Do you want to improve your sleep quality without using medication or other expensive treatments? At globalebooksstore.com, we believe that reading a good book before bed can help promote better sleep hygiene. Our website offers a wide range of e-books from all over the world, emphasizing diversity and inclusiveness.
Although our domain name might not directly relate to mattresses or sleeping, we understand the importance of promoting healthy habits for getting a good night’s rest. That’s why we’re linking to an article on comparing no see um and bed bug bites. We know that insect bites can be incredibly uncomfortable and may even keep you up at night. By providing information on how to distinguish between different types of bites, we hope to alleviate some of the stress and discomfort associated with this common problem.
In addition, our website includes resources for finding books suited for bedtime reading. We understand that not all genres are appropriate for winding down before sleep – horror stories might cause nightmares while non-fiction may be too stimulating for relaxation purposes. To ensure our readers have access to calming and soothing literature, we provide recommendations on gentle fiction or self-help books that can promote better sleep quality.
At globalebooksstore.com, our goal is to provide readers with the tools they need to improve their overall well-being – including their sleep hygiene. By offering diverse content from around the world and linking to helpful articles like comparing no see um and bed bug bites, we hope our website serves as a valuable resource for those looking for ways to get a better night’s rest.
The time needed to assemble an Ikea bed will depend on a variety of factors, including the type of bed and the size of the pieces. Generally, a double bed will take between 1.5 and 2 hours to assemble. The most challenging part of the process is determining which pieces go where. To avoid confusion, seasoned do-it-yourselfers recommend taking out each piece in the order that it was packaged and laying them out in the same design as the bedframe.
IKEA provides assembly instructions for most of their products, which can be helpful for those who do not have the necessary skills to put together a bed on their own. Many of these instructions will also include photos and videos for ease of understanding. You can also visit IKEA’s website to find videos of how to assemble their most popular products.
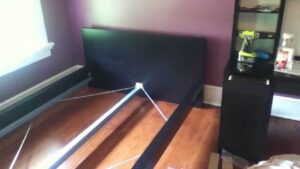
The first step is to locate the holes in the bed frame. You should then place a circular piece on the holes and tighten the screw with an Allen key. Once this is complete, the next step is to attach the two metal rails on either side of the head board. Each rail requires eight screws. You’ll also need to attach the crossbars that run from two holes in the food board to the head board.
Once you’ve purchased the necessary parts, you can start the actual process of assembling your new IKEA furniture. Depending on the product, this process can be quick or complex. The instructions will be included with the piece of furniture and can be found on its product page. You can follow the instructions to the letter and ensure that the unit is safe and secure once assembled.
The assembly process can take up to 1.5 hours. However, if you’ve already assembled IKEA furniture before, you’ll find the process less daunting than you thought. It’s also possible to complete the process in as little as thirty minutes. It’s also helpful to have someone with you to help. A pair of people can speed up the process and ensure the instructions are clear and follow the steps properly. In addition, additional hands can help with reaching awkward positions.
After you have figured out the best way to set up your Ikea bed, the next step is to follow the assembly instructions carefully. This step is especially important if you’re assembling a child’s bed. Using the correct instructions will ensure that your children have a comfortable night’s sleep.
Ikea bunk bed instructions
To put together an Ikea bunk bed, you’ll need some basic steps to follow in order to complete the process. The first step involves unscrewing the two screws that secure the ladder to the bed frame. These are located on each side of the bed. To remove them, you need an Allen wrench or flat head screwdriver. To loosen these bolts, turn the Allen wrench counter-clockwise while holding the cap in place. Once the screws are removed, you can remove the slats and metal railing.
Next, you’ll want to follow the instructions on the Ikea bunk bed frame. The instructions are very easy to follow. Once you have these parts, you can start assembling your bed. You may need to use a stock screw to attach the bed frame to the wall. This is important, because there are some pieces that don’t line up properly and you may need a stock screw to get the job done.
Then, read the IKEA manual carefully. Several steps are involved in assembling the bed, so it may help to get an extra pair of hands to assist. You can also use an Allen wrench or flat screwdriver to remove the plastic caps from the loft bed’s bolts. This step is essential for ensuring a strong foundation for the mattress.
If you get stuck in the middle, you can always try to contact IKEA’s customer support center. They offer online assistance and also have a support contact center that will answer your questions. It’s important to follow all of the steps carefully to ensure a safe and durable product. It’s worth noting that the IKEA bunk bed instructions don’t say anything about the actual cost of the bed.
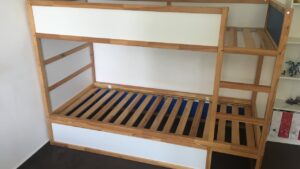
IKEA bunk beds are built out of durable pine and can be stained or painted. They also come with a slatted base. The ladder is usually placed at the back of the bed frame. Some models allow you to move the ladder to a new location if you want to. Other models feature stairs, which make it easier for younger children to access the top bunk.
The bed has plenty of storage and will brighten up a room. A nice bonus is that it’s easy to clean. You can also choose from a variety of different colors for the frame. This way, you can choose what best fits your room. Once you have the perfect color scheme, you can choose a mattress and bedding that will complement the room’s decor.
The second step is securing the bed frame to the bunk. The frame is typically made of wood slats. In some cases, this is reinforced by additional bars. Be sure to check the slats regularly to ensure they’re not loose. If they are too loose, the child could fall over the top.
Ikea loft bed instructions
To assemble an Ikea loft bed, you will need to follow the steps outlined in the instructions. The first step involves preparing the support beams. These must be drilled with the appropriate size bolts. After you have prepared the base beams, you will need to attach the sides. You will also need to add a guardrail to the sides.
In order to do this, you will need to remove the mattress and move the ladder. Then, remove the slats from the metal railing. Once you have done this, you can remove the rest of the screws that secure the bed frame. It may help to have an extra set of hands.
Once you have gathered all the parts and components, you will need to follow the instructions carefully to ensure that the beds fit together properly. These instructions are available for free on the IKEA website. These will help you to assemble your new loft bed correctly. Also, you can view a video demonstration that will help you complete the task.
Ikea bed frame instructions
The IKEA bed frame instructions are a visual guide that will help you assemble your new bed. Most of these instructions come in the form of a video, which explains the steps in great detail. They are also available in many different languages. Since the Swedish furniture giant has operations in more than thirty countries, they have taken language differences into account when designing their instruction manuals. They realize that writing instructions in every language would be very expensive, and some people may not be able to read or understand English well.
Before assembling your new bed, you’ll need to remove your existing mattress and bedding from it. Next, you’ll need to unfasten the mounting plates for the midbeam. In addition, you’ll need an IKEA wrench tool to loosen the hex bolts that attach the headboard and footboard to the frames. If you’re unsure how to remove the U-shaped hardware, a friend may be able to help. To remove the footboard, use a step-stool or a friend to hold the side rail.
There are many different types of Ikea bed frames, from airy to solid and heavy. One popular model is the MALM storage bed. This frame is perfect for any interior and can solve your storage dilemma. It is a versatile piece of furniture that’s very easy to assemble. It’s a sturdy bed that can fit almost anywhere in the home.
If you’re having trouble assembling your Ikea bed frame, try searching online for a DIY guide. Usually, these instructions include photos to help you with the process. They also include a list of materials that you’ll need to purchase. Make sure you have enough time to read them before you start assembling the frame.
Ikea bed slats instructions
If your IKEA bed slats don’t fit tightly, apply a small amount of grease to the metal parts. Be sure to jostle the nuts and bolts as you do so. Then, roll your body on the mattress and check for squeaks. If you find any, use a candle or paraffin block to lubricate the slats.
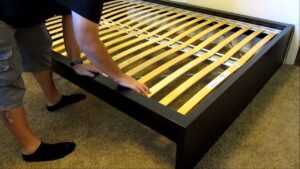
Many IKEA beds are notorious for their sagging slats, which cause the mattress to sink. While this can be a challenging situation to solve, it is possible to make some repairs on your own. Depending on the size of your bed and what tools you have, you can install new slats. Make sure to replace the slats on a regular basis.
A box spring is an unnecessary piece of furniture when you have an IKEA bed. While the bed frame itself is snug and tight, you may notice a squeaky sound when you toss and turn, which will ruin your sleep. It is also possible that you don’t need a box spring, if you’ve opted to skip the box spring.
You can also use duct tape to keep the slats from falling. This works similar to velcro strips, but duct tape is more common. You can use a small piece of duct tape and loop it twice around each slat. Then you can secure the slats to the bed frame using the loops.
Be sure to check if there are any pins attached to the bed frame. The slats will not remain stable if the pins come out by accident. Make sure to replace any damaged ones if needed. This will ensure that they will support the weight of whoever is sleeping on the bed.
You can purchase solid slats at a home depot or lumber yard. You can also buy a slat kit. Be sure to put support legs on the center beam of the bed frame before installing the slats. Depending on the size and design of your bed, you may need to add additional support legs.
You can also add screws to keep the slats from sliding around. You can use wood screws for this, but you can also use metal screws if you have a metal bed. The placement of the screws will depend on the size of your bed and how much movement the bed does during the night.
If you are not sure how to attach the slats, you can look for an online resource. You can find many guides that will walk you through the installation process. Most of them are easy to follow and will save you a lot of trouble. And if you do want to learn how to put them together, you should try this video.
If you have a solid metal bed frame, you may be experiencing squeaking. If this is the case, you can try to repair the squeaking problem yourself. The first step is to unscrew the mattress. Then, unscrew the screws and place washers on them. Next, apply a lubricant to the springs. Petroleum-based lubricant is best for this. You can also wrap the legs of the bed with electrical tape to stop them from squeaking.